We have moved our blog over to Wordpress. All of our old posts (and all of the new ones) can be found at the link below.
Shrewsbury EdTech
http://spsedtech.wordpress.com/
Sunday, September 14, 2014
Saturday, June 7, 2014
Using Google Sheets as a Paper Organizer
Greetings!
We know our Tech Tips have been somewhat scarce this year -- but we are looking forward to having the time to publish more of them, during the upcoming school year. In the meantime, here's one for June...
In yesterday's professional development session for content area teachers, one of the ideas discussed was the use of Google Sheets as an organizer. This has a lot of potential and, for those who are interested, we have included a link to one which I have been using for the past couple years. Why use a Google Sheet as a graphic organizer? It has a number of benefits, including:
 Here is the basic sheet I use:


In yesterday's professional development session for content area teachers, one of the ideas discussed was the use of Google Sheets as an organizer. This has a lot of potential and, for those who are interested, we have included a link to one which I have been using for the past couple years. Why use a Google Sheet as a graphic organizer? It has a number of benefits, including:
- real-time collaboration and feedback
- the ability to sort details according to their use in the paper
- the ability to limit the view, so a student only sees the details for one section / paragraph at a time.
Here is the basic sheet I use:
In this shot, you can see some of the key features -- I have color-coded areas up top for the thesis / topic statement, followed by a second area where a student can list the subtopics -- categories for sections of their paper, or paragraphs. Each comes with a pre-set abbreviation (a simple letter, from A to E.).
The next section is where kids enter their information for the paper, with columns for source information, quotes / details and their importance, and a checklist box for them to use as they move details into their paper. The category column - color coded to match the the topic area above - is where students will indicate which section each detail fits.
Here's an example from a literary analysis paper (where there is no "source number" column, because they only use one source...
The student had brainstormed a series of subtopics for her paper...
... and then used these categories as she entered details into her spreadsheet. Each detail is now coded according to the categories she had brainstormed.
Once she had entered all her details,
she could then sort them, using a pull-down menu at the header for each column. She can simply sort by category, or choose a particular section to view. This allows her to focus on one paper of a time.
Once she has everything entered and sorted, she can paste her information into a document or organizer, to begin the formal writing process.
Another benefit to the spreadsheet format is the ability to insert a sheet which contains specific instructions for students, regarding how to use the spreadsheet. Here is the one I include with the organizer.
Note that I color-coded specific instructions to match sections of the organizer - the thesis area is yellow, the category section is pale tan, etc. This makes it easier for students to follow the directions.
Another benefit to spreadsheets is the ability to use the "insert comment" feature to create scroll-over hints / instructions within the sheet itself.
On the organizer, I include tips above several of the columns -- you can see where the tips are, by looking for the little orange triangles in the corner of a cell.
Once you have your master copy set up for student use, just place it in a shared folder, and set the sharing settings to "anyone can view" -- this way, your students can make copies of it for their own use, without affecting your master copy.
Want to experiment with it? Feel free to access my master document, make a copy, and play around with it. Drop me a note if you have any questions, or want to see it in action!
Happy June, everyone, and enjoy some well-earned relaxation over the summer!
Derek
Wednesday, April 30, 2014
Science Review Games
I know this is not a "Tech Tip" exactly, but we have been playing some fun review games in class to prepare for the energy test. It's been a fun two days so I wanted to share!
Vocabulary Games
Science has a lot of vocabulary for students to learn. One strategy I have long used to help them review these words is to print out vocabulary cards on card stock. Each card has one vocabulary word. I print out one set of cards for the eight groups in my class. My homeroom students help by cutting the cards out and placing them into a Ziploc bag.
The main idea is for a student to give clues to the others at their table so they can guess the word. There are many different ways for them to set this up. Usually, one student gives clues while the other three try to guess. Sometimes, they will form two teams that compete against each other.
I let students decide how to give clues. The three main options have always been Pictionary, Taboo, and charades.
Pictionary - Student draws clues on a large whiteboard. They cannot write down any words, and they are not allowed to talk or use gestures.
Taboo - Student gives verbal clues. They are not allowed to mention any word or part of a word written on the card. They are also not allowed to use gestures.
Charades - Student can only use gestures as clues. I also let them use props. However, no speaking and no drawing.
As students played these games in class yesterday, one group suggested another variation called "Catch Phrase". It's similar to Taboo, but there are two teams. As soon as one team correctly identifies one term, they quickly hand the cards off to the other team. It goes back and forth, and the goal is to get through as many of the vocabulary cards as they can in one minute. I thought this was a great idea and decided to take it one step further in my last class of the day. The last 10 minutes of class was a class Catch Phrase competition. The goal of the competition was to be the table that correctly identified all vocabulary cards in the shortest amount of time.
Sports Challenge
Each year, as the NHL and NBA playoffs are kicking off, I have a sports challenge review game for the test on energy transformations. In a traditional review game (such as Jeopardy), students earn points for their team by answering questions correctly. That is not the case here!
There are eight teams with each team having four students. Each team was assigned an NHL hockey team currently in the playoffs. Students had to rotate at each table and take turns answering questions. I made a Google Presentation with many energy-related questions and asked students to stand up as soon as they knew the answer. If they got it wrong, I moved on to the next student. If they answered correctly, they could then try to earn points by doing a sports challenge! If they were successful in the challenge, points were awarded to their team. If they were not successful, they received no points. It's also worth noting that if no students could answer the questions, I gave the teams a clean slate and allowed them to collaborate at their tables.
Here are the challenges:
Hockey challenge: My desk makes a perfect hockey goal. Students had the option shoot against me as goalie, or they could play goalie and try to stop my shot. If they were successful, they earned 3 points. For the ball, I used a ball of paper wrapped in masking tape.
Soccer challenge (new this year): This is exactly like the hockey challenge except they used their feet with the tape ball instead of hockey sticks.
Basketball challenge: The goal is to throw the tape ball into a trash bin. There were a few different lines to shoot from. As the line distance increased from the basket, the points increased from 1-3 points. There was also a 5 point opportunity if they made a shot from behind my desk in the back of the room. The one rule here is their foot could not be past the tape. If so, I threw the flag (my yellow Terrible Towel) and the basket did not count.
Juggling challenge: Students tried to juggle three balls as long as possible. If they juggled for 5 seconds, they earned 3 points. If they juggled for 10 seconds, it was worth 6 points.
Here are some of today's highlights:
- Until this year, I have only ever had two students make the 5 point basketball shot from behind my desk. Today, three students made it, and they were all in the same class!
- One student made the most amazing 3 point basketball shot of all time. The ball bounced off the ceiling, bounced off the floor, and then landed right in the basket. I wish someone videotaped it.
- When I had two students stand up at the same time (and they both knew the correct answer), we had a "head to head" challenge in hockey, soccer, or juggling.
- The greatest moment came when two teams were tied for second place at the end of the game. I had each group choose one student to represent their team in a final timed challenge. They had to first score a hockey goal on me as goalie. They were allowed to shoot again and again until they scored. Once they did this, they had to quickly grab the ball and make a "2 point" basketball shot. If they missed, they had to retrieve the ball and keep shooting until they made it in. The first student completed it in 57 seconds. The second student took just over a minute. It was intense!
Needless to say, this was a very fun and engaging review session. Students were motivated, competitive, and very spirited. Feel free to use any of these review ideas in your classroom. For what it's worth, the four winning teams today: Boston Bruins, Philadelphia Flyers, Pittsburgh Penguins, and LA Kings. Could these be the final four teams in the NHL semi-finals? We'll see!
Friday, February 28, 2014
Tech Tip: Thoughts on a balanced life amid technology
We are all wired.
No longer does this mean highly caffeinated, although - for most educators (especially those of us on 8 Gold) - this old definition still does hold true: now, it refers to the fact that, at any given moment, we are leading a dual existence. We are doing what we do, walking and teaching and eating and whatnot while also keeping one foot in the digital realm.
How many times a day do you reach for your phone or device? How often do you look at a screen while eating your lunch? For many of us, it's pretty frequent - and even more so for our students. They seldom do one task at a time, and even less so now that so many of our lessons and activities are based in a digital realm. I know that, while my students are working on papers on Google Drive, they are also chatting in a side window, posting on Instagram, listening to digital audio, and responding to the buzz of an incoming text.
So, what's wrong with this?
Ray Bradbury seemed to know what he was talking about in Fahrenheit 451. By doing several tasks at once, we don't do any one of them fully - we cannot multitask. What we do is divide our attention and compensate for the gaps thus created.
As educators, part of our job now - whatever subject we teach - is to help students navigate this digital realm, and find balance in their lives... to remember that living - real living - involves time in the moment, to really experience One Thing, whatever that one thing may be at any given time.
Anna Akbari has posted an excellent piece on CNN about just this sort of thing - ways to find a balance. I found it very worthwhile reading, and think there are some tips in this for both ourselves and our students. Give it a look.
http://www.cnn.com/2013/09/05/tech/web/can-technology-make-us-happier/index.html?iref=allsearch
Monday, January 20, 2014
The #Instagram Photo Scavenger Hunt
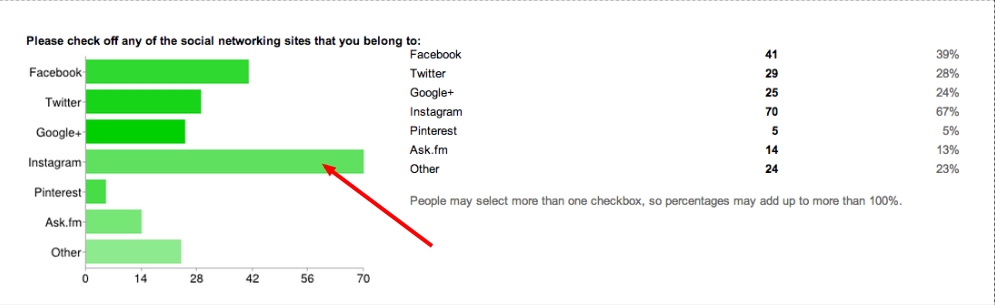
Facebook has been the #1 social networking site for a while now. In past student surveys, more students used Facebook over any other site. Twitter and Instagram have become more popular the last few years while Facebook has seen a decline. Based on student feedback and information online, more and more teenagers are abandoning Facebook because they feel there are too many adults monitoring their behavior. As you can see in the graph below, only 39% of our students have are active Facebook users while 67% use Instagram. Twitter usage is still behind Facebook, but I expect that to change very soon.
What Does This Mean?
Even though I pride myself on being "tech savvy", I am always late on the technology bandwagons. I have only had a Twitter account for the past year or so and finally forced myself to join because I knew there were some great benefits for networking. I have resisted Instagram because I always thought it was just something middle school girls used for taking "selfies". As I looked into it more over Christmas Vacation, I realized it too had a lot of possibilities. Plus, I knew it was about time I learned more about the tool that so many of my students were using. As someone once said, don't fight change. Embrace it!
Both Twitter and Instagram utilize hash tags (#) to share and search for information. The "aha" moment for me (and the deciding reason why I joined Instagram) deals with my plans for the upcoming summer. As many of my teacher friends already know, I am planning to volunteer with kids in Morocco through an organization called Cross-Cultural Solutions. After doing research into the organization and their destinations around the world, I learned that each CCS destination has its own hashtag. For example, the Morocco hash tag is #ccsrabat. If I search for this hash tag on Twitter, Instagram, or Flickr, I can find pictures and information from past volunteers. Very cool!
The Old Scavenger Hunt
Last year, I had students do a photo scavenger hunt as a fun way of reviewing some of the chemistry concepts we had been learning before vacation. They took pictures of elements, compounds, and mixtures around the school building with their cell phones and iPads. They also searched for evidence of physical and chemical changes. We spent another day in class sharing these pictures in groups and making presentations using Google Drive. Each slide had to have an image, a label (element, physical change, etc.) and an explanation. There was a final day where groups presented to the class. All in all, it was a fun way to segue back into learning after a school vacation. The drawbacks were the troubles sharing pictures in a group, and I thought three days was a bit too long.
The New Scavenger Hunt
Over the vacation, as I played around with Instagram, I reflected on how to make this year's scavenger hunt even better by including elements of social media. I decided to give students two options: Instagram or Twitter.
If students opted for Instagram, they would take pictures or videos (up to 15 seconds) using their own Instagram account. They would choose from a list of hash tags to identify each image. The student must have a public Instagram account for this to work because hash tags are not searchable on private photos.
If students opted for Twitter, they would take pictures and upload to Twitter. If they wanted a short video clip, they would use the Vine app, then share it on Twitter. Like with Instagram, they would label each one by choosing from a list of hash tags.
The Hash Tags...
#8goldsci (this hash tag would be used for all images)
#mixture
#homogeneous
#heterogeneous
#puresubstance
#element
#compound
#physicalchange
#chemicalchange
How Did It Turn Out?!
Luckily, we had our "team time" first period. I polled the team and realized that while most of them wanted to use Instagram, very few students had public Instagram accounts (which is a good thing for their privacy but not for this lesson!) I ran into another room and created a new team account (@8goldteachers). Luckily for us, Instagram supports multiple log ins for the same account. So, rather than have students use their own account, I was able to have ALL students take photos on their phone using the new 8 Gold teacher Instagram account. There were some small delays uploading photos, but overall it worked out very well.
Students took some great pictures and videos, and most of them (unfortunately, not all) were labeled accurately. The next day, I looked through them all and shared some of the best ones on our team Twitter site. Students seemed more engaged than last year and were very excited to see that some of their photos were "liked" by others. I even noticed a few of them "liked" photos using their own accounts as well.
There is one improvement I will make next year. It was tough for students to remember all of the hash tags and how to spell them, so next year each group will receive a handout of all hash tags, along with the definitions for each label.
Have any other ideas for using Instagram in class? Please share!
Sunday, December 1, 2013
Ed Tech Resources: December 1st, 2013
Now that you have finished digesting all of the turkey, stuffing, and desserts, here are some of the articles and tweets that I found interesting over the last few days.
Some teachers already use an app called Nearpod to share class presentations with students. This blog post details this app, as well as many alternatives. Another option not included in this post (but was later mentioned somewhere else) is a new site called Presentain. This service is still in Beta mode, but one feature that looks promising is the ability to "push out" Google Presentations to students.
7 Ways to Show Your iPad on a Projector Screen
Many of us already use the Reflector software, but it's always nice to know what's out there.
Zdeno Chara has Blueprint for Team Leadership
This has nothing to do with technology. However, we often encourage our students to step up and be leaders in and out of the classroom. There has been a lot of information in the news recently about a lack of leadership in sports. I think we can all learn something from the Bruins captain!
Blog Posts/News Articles
Slideshows in SyncSome teachers already use an app called Nearpod to share class presentations with students. This blog post details this app, as well as many alternatives. Another option not included in this post (but was later mentioned somewhere else) is a new site called Presentain. This service is still in Beta mode, but one feature that looks promising is the ability to "push out" Google Presentations to students.
7 Ways to Show Your iPad on a Projector Screen
Many of us already use the Reflector software, but it's always nice to know what's out there.
Zdeno Chara has Blueprint for Team Leadership
This has nothing to do with technology. However, we often encourage our students to step up and be leaders in and out of the classroom. There has been a lot of information in the news recently about a lack of leadership in sports. I think we can all learn something from the Bruins captain!
Tweets
Film widescreen video on the iPad by double tapping the screen in the camera app. Who knew? HT @sly111 #ipaded #edtech #mlearing
— Jonathan Wylie (@jonathanwylie) November 28, 2013
Help this teacher make a great point to her students about the consequences of social network use. Please RT widely. pic.twitter.com/Qx9A88BMve
— Dave Malouf (@daveixd) November 28, 2013
It's important to note that this guy retweeted her image. Just his retweet alone has been retweeted over 20,000 times!!! I imagine the original image has been seen over 100,000 times at this point. It's a great lesson to share with students regarding digital citizenship and how quickly images can go viral online.
Get @Readdle apps with an amazing 50% discount. I would buy them myself, but I already have them all! http://t.co/AxWGeyrGmz #blackfriday
— Jeremy Mularella (@mrmularella) December 1, 2013
If they're still on sale (and they may not be), my favorite app is Calendars 5. I like it much more than the native calendar iPad app.
Monday, October 14, 2013
Ed Tech Resources - October 14th, 2013
As technology teacher leaders, we are always looking for tech tips to share with you. My two main curation tools for doing this have been Feedly and Twitter. Feedly is a news aggregator that replaced Google Reader some time ago. I subscribe to many different blogs that share ideas on education, education technology, science, etc. The feeds for each blog gets sent directly to my Feedly account. Every other week or so, I scroll through all of the recent blog posts and read the ones that sound interesting. Depending on what it is, I may bookmark that particular article on Diigo or share it on Twitter.
I also follow numerous educators, administrators, and products directly on Twitter. Every once in a while, I will scroll through my Twitter feed, looking for relevant information. Once I find something I like, I again either bookmark the information or "re-tweet" it on Twitter.
So, what does this mean? Two things. First, if you use Twitter, you can follow me (@mrmularella) to see the resources I am sharing. My Twitter feed can be found here. You will notice I rarely tweet myself! Second, many future blog posts will just be a collection of online resources for you to explore. Rather than write one tip myself, it's much easier and quicker to share online resources written by others (who frankly do a much better job than me anyway).
iOS 7 Resources
The new iPhone/iPad operating system was released about a month ago. Before you have students update their iPad (wait until you hear from Alex!!), we recommend you learn a bit more about this new OS. It can take some getting used to at first.
Google Drive Resources
Other Resources
Wednesday, September 18, 2013
Finding My "Teacher Voice" on Social Media

Recently, the focus has been on social media. It seems like whenever a new social tool emerges, it promises to reinvent education. I have been to a few "ed tech" conferences where there is a feeling by many that if you're not using social media in class, you're not a good teacher. I don't agree with that idea at all. However, like many of you, I have been trying to trying to wrap my head around how (and even if) I should use sites like Facebook and Twitter. Since Shrewsbury public schools seem to be hopping on the social media bandwagon, I figured now is the perfect time to share my thoughts.
Facebook
I started an official 8 Gold Facebook page two years ago. This format allows me to share information without having to "friend" students and parents. I would NEVER recommend for a teacher to "friend" students or their parents. A general rule many teachers I know follow is we will accept friend requests from former students once they graduate high school, no earlier. Our team website has a button that lets parents and students "like" our Facebook page, which allows them to see team updates in their Facebook News Feed.
Twitter
I started an official 8 Gold Facebook page two years ago. This format allows me to share information without having to "friend" students and parents. I would NEVER recommend for a teacher to "friend" students or their parents. A general rule many teachers I know follow is we will accept friend requests from former students once they graduate high school, no earlier. Our team website has a button that lets parents and students "like" our Facebook page, which allows them to see team updates in their Facebook News Feed.
There are two primary purposes for the team Facebook page:
- Communicate with alumni (students and parents). This is a great way to let them know about upcoming team and town events such as road races or hiking trips up Mt. Monadnock.
- Share pictures and videos. I created a team photo gallery for last year's students and added pictures from different events throughout the year. ALL students and parents can access the pictures, even if they do not have a Facebook account. They can "like" photos but comment and tagging are both disabled. I set up a new photo gallery for this year's class.
While the Facebook page came naturally, I have had a tough time embracing Twitter. In fact, I downright hated it for the longest time. Again, I will go back to one of those ed tech conferences I attended with Derek. We were the only two teachers with name tags that included our actual names. Everyone else wrote their Twitter handles instead. Really? The whole thing seemed very pretentious to me.
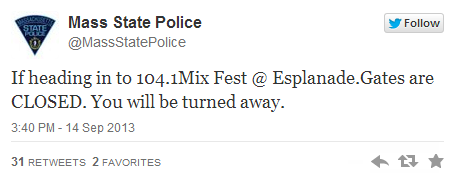
I've always thought Twitter had potential for sharing news in "real time" but wasn't sure about how to utilize that in an educational setting. Just this past weekend, I sat with a friend in a bar in Boston before the MixFest concert. We thought we could stroll up fashionably late to the Esplanade to see our new favorite band from Iceland, "Of Monsters and Men". At one point, there was confusion among people at the bar whether the gates had already been closed off to more people. I pulled up Twitter on my phone and searched for "MixFest". Sure enough, the very first tweet was by the Boston State Police. (see below) As upset as I was that I wasn't about to get inside the gate, I was secretly impressed with myself that I was able to find an answer to our question in about 20 seconds.
I started a personal Twitter account about a year ago (@mrmularella). The toughest part was identifying my audience. Who would care about what I tweet? Who do I care about enough to read their tweets? I now "follow" a few friends but primarily use it to follow experts in the field of education. There are some scientists, teachers, principals, and leaders in the ed tech field. I mostly lurk in the background, reading their tweets and occasionally retweet something. Very rarely did I post something myself because I kept thinking, "who cares what I have to say?"
Over the summer, it all finally made sense to me. I could use it as a communication tool with students and parents. I did not want them to follow my personal account so I made a new account for our team (@8goldteachers). I shared the login infomation with the other 8 Gold team teachers so all of us could tweet out under this name. This then led to the most recent update to our website. I embedded the team Twitter feed into our main site so anything we post to Twitter also shows up on the website. This allows us to share team news and events in "real time"!.
So, how am I using Twitter to communicate with parents and students?
Here are some of the things tweeted during the first few weeks of school:
Here are some of the things tweeted during the first few weeks of school:
- Links to online resources (bullying, social media, cross country signups, etc.)
- Quick reminders and notes like "Great to meet you all at Curriculum Night")
- Pictures from class labs
- Links to team YouTube videos
One of my potential favorite aspects of using Twitter as a communication tool is the act of "retweeting". The @8goldteachers account is "following" school and district administrators, as well as others in the community. See the full list here. If Dr. Sawyer tweets something I think our parents should know about, we can retweet his thoughts, which add them to our Twitter timeline.
As of right now, we have thirteen students/parents following us on Twitter, but I'm hopeful that number will grow throughout the year. Other those thirteen, I honestly have no idea how many people are looking at these updates on the website. The parents seemed very receptive to the idea on Curriculum Night, but I may find out I'm still not reaching my desired audience. The experiment continues!
Saturday, September 7, 2013
Taking notes on a video? Try this!
Nowadays, for almost any topic in any subject, you can find a supporting video somewhere on the web. Whether it's a flipped lesson, where you record a screencast for kids to see later, or a clever music video about a history topic you found on Youtube, there are many opportunities for both teachers and students to expand their learning base.
One issue I've run into when setting up a video for the classroom is narrowing down a lengthy video to the selections I want to use in class, and then getting to those clips quickly. Another issue is a solid way for students to take notes from a video, quickly and efficiently.
Enter a new web tool to solve both problems:

What is it? Put simply, it is a site which allows you to take notes while watching a video, and it synchronizes these notes with the video itself. In other words, if you are watching a 20 minute video, and see something you want to use 3:15 into it, you type the note while watching and your note becomes a video bookmark: click on the note you made, and you go to that point in the video.
Here's how it works.

First, go to the site. It will ask you to link with your Google Drive, and it can also connect with Evernote. This is a nice feature - as you'll see, once you click "Connect with Google Drive" it will create a new folder called VideoNot.es in your drive account - this is where all the notes you take will be saved.
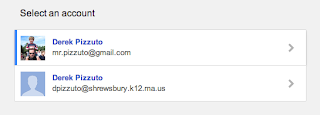
If you have more than one Google Drive account, it will allow you to choose which account to use once you log in. The first time you sign in, you'll be asked to give the app permission to modify your folders.
Once you agree to this, here is the basic interface:

On the left side, you enter the URL for the video you wish to use. The site recognizes ones on Khan, You Tube, Coursera, EdX, Vimeo, etc. This is a limitation - for example, if there is a video on a news site, you can't load it in, unless it has been loaded onto You Tube as well.
 On the right side, you take your notes. As soon as you start typing, that line of notes is tagged with the exact second the video was on. When you hit return, it ends that note and you're ready to start the next one. Click on that note later, and the video will automatically move to the moment connected to the note.
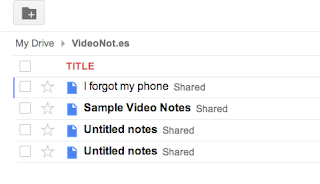
Once you finish your notes, you can then save them to your Google Drive account at the touch of a button. The notes will appear in a folder called videonot.es, although - in order to view them - you must go to the Videonot.es site.
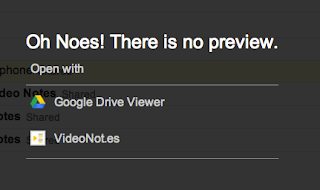
If you try to view them in Google Drive, you'll get this message, and clicking on"Google Drive Viewer" does not work - you need to click on the VideoNot.es option in order to go to your saved notes.

The way to overcome this limitation is to link your Videonot.es to your Evernote account.
In Evernote, you can take a snapshot of the video and attach it to your notes.
Furthermore, the notes are fully visible in Evernote - giving you full access to your notes without having to be in the videonot.es site.
This is particularly useful if doing research, as you can tag your notes from multiple sources in order to sort by topic, etc.
I can see students using this tool on projects, when working with a flipped classroom video... and - from the teaching perspective - being able to click on a bookmarked note and go to the exact part of a video you want to show, and then hop to the next segment when done, can be a real headache saver.
Give it a try and - per usual - let us know if you have any questions or suggestions.
Derek & Jeremy
What is it? Put simply, it is a site which allows you to take notes while watching a video, and it synchronizes these notes with the video itself. In other words, if you are watching a 20 minute video, and see something you want to use 3:15 into it, you type the note while watching and your note becomes a video bookmark: click on the note you made, and you go to that point in the video.
Here's how it works.

First, go to the site. It will ask you to link with your Google Drive, and it can also connect with Evernote. This is a nice feature - as you'll see, once you click "Connect with Google Drive" it will create a new folder called VideoNot.es in your drive account - this is where all the notes you take will be saved.

If you have more than one Google Drive account, it will allow you to choose which account to use once you log in. The first time you sign in, you'll be asked to give the app permission to modify your folders.
Once you agree to this, here is the basic interface:

On the left side, you enter the URL for the video you wish to use. The site recognizes ones on Khan, You Tube, Coursera, EdX, Vimeo, etc. This is a limitation - for example, if there is a video on a news site, you can't load it in, unless it has been loaded onto You Tube as well.


Once you finish your notes, you can then save them to your Google Drive account at the touch of a button. The notes will appear in a folder called videonot.es, although - in order to view them - you must go to the Videonot.es site.

If you try to view them in Google Drive, you'll get this message, and clicking on"Google Drive Viewer" does not work - you need to click on the VideoNot.es option in order to go to your saved notes.

The way to overcome this limitation is to link your Videonot.es to your Evernote account.
In Evernote, you can take a snapshot of the video and attach it to your notes.
Furthermore, the notes are fully visible in Evernote - giving you full access to your notes without having to be in the videonot.es site.
This is particularly useful if doing research, as you can tag your notes from multiple sources in order to sort by topic, etc.
I can see students using this tool on projects, when working with a flipped classroom video... and - from the teaching perspective - being able to click on a bookmarked note and go to the exact part of a video you want to show, and then hop to the next segment when done, can be a real headache saver.
Give it a try and - per usual - let us know if you have any questions or suggestions.
Derek & Jeremy
Thursday, August 29, 2013
Sharing Folders in Google Drive using Class Groups (revisited)
This was shared with you last year, but it's so helpful that we wanted to share it again...
Most teachers seem to be using Google Drive to share handouts with students. Google Drive is an online "cloud" storage system that also includes the "Google Docs" productivity suite (Docs, Spreadsheets, and Presentations). In order to share resources with students, two things must happen. First, you must put the files in your Google Drive folder. Then, you must find a way of sharing the files with students. The easiest way of doing this is to create a Google Drive folder for all of your handouts.(This folder can have subfolders for different units. All subfolders within your main folder are also shared with the students.)
In the sharing settings, you have numerous options. I always make my folder "public on the web". This allows others to search for your folder (though it's nearly impossible to find). It's just my science handouts, and I am happy to share with others. You will be fine choosing any option except "Private".

Next, you will need to share it with your classes. Last year, I spent around 30 minutes typing all 120 student names and sharing my folder individually with each student. Now though, there is a MUCH simpler way to do this. Since all students have school Google accounts, you can share with a "class group". The folder is then shared with all students in that class group! As you can see in the image below, I shared my "Science Docs" folder with the class group for all of my science students. .

The class groups are generated through PowerSchool. This means it constantly gets updated as your PowerSchool rosters get updated. If you gain a new student in January, your handouts are automatically shared with them! Read Brian L'Heureux's blog post on the SLN (will need to log in) that explains where to find these class group codes in PowerSchool.
Important note #1: The class group code in the blog post starts with "1213" because it is from last year. Your class group code should begin with "1314".
Important note #2: Make sure your students only have "can view" privileges. You do NOT want to give your students "can edit" access. If you do, they can alter/delete all of your files!!
Saturday, August 24, 2013
Socrative and Wordle on day one: getting to know your students
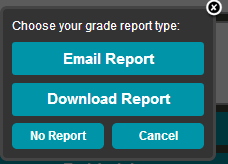
Many of us start the year with "getting to know one another" activities. this year, I am updating my opening activity using a combination of Socrative and Wordle.
Over the last few years, I have used a post it note activity for this purpose. I would give the students three prompts: 'what is a goal you have for this year'; 'what is one question you have about me or my class'; and 'what is one concern you have about this upcoming year'. Students would choose two of these questions and write the response for each on a Post-it note. They would then place their Post-it notes on one of three poster boards I had put up on the walls in my room. Once my students had finished their responses, we would tour these boards and have an open discussion about common themes we saw that people had. The responses were anonymous, and this helped open doors to conversations as the year started.
While I liked this lesson, the poster boards covered in little stickies were difficult to organize and find patterns within them. It occurred to me that this should be a simple a way to do this with the technology we have on hand. With a few minutes of searching the Internet, I found a solution on a great blog called "Socrative Garden". Briefly, they take the questions that I use at the start of the year and turn them into an open response quiz on Socrative. Once the results are in, and you have them sent to you in spreadsheet form, you can copy the answers that were submitted for any one question and paste them into a Wordle.
To get started, you have a couple choices:
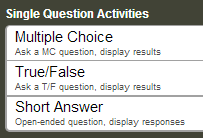
Option 1: if you want to focus on one question at a time, you can simply create a single question activity in Socrative: a short answer question.
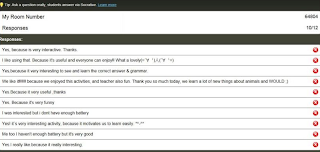
Once your question is created, it is very easy to then create a Wordle in a matter of seconds. Once the activity goes live, the student responses will appear on your teacher screen.

Copy the results, and paste them into the text box at Wordle. Then click "Go."

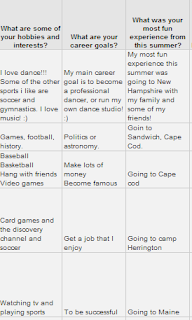
You now have a word cloud of the results, which you can use to provoke discussion in your class. you and your students can see which words and terms came up most frequently – not only is this great for the start of the year, but also for any time you want a quick check in with the kids during class.
I can see using this at the end of a chapter in a novel, when reviewing what a student knows about any particular unit or questions they have about a particular topic, etc.
Your second option for how to set this up is useful if you have several questions that you want students to answer at the same time.
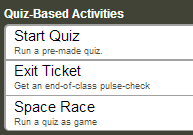
In this case, you would create a quiz based activity in Socrative.
This will allow you to create several questions together, which the students will take at one time.
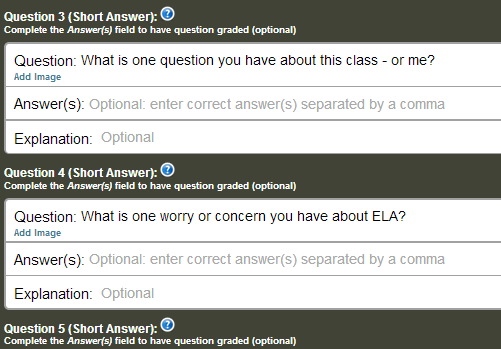
Note that when you start a quiz activity in Socrative, the first question is automatically set to ask for the respondent's name. If you want your quiz to be anonymous, instruct students to simply enter a period for their name.

Add in whatever questions you wish. I leave the answer and explanation sections blank, as there are no right or wrong answers with this sort of an activity.
Once you finish designing the quiz, give it a name and save it.
Once you give the quiz, the live responses section on Socrative will not have any real results if you did not put in "right answers". Instead, you need to wait until all the students have finished and then end the activity.

When you end the activity, have Socrative email you the results.
This will give you a spreadsheet just like you get when you do a Google survey.
Copy one column at a time, and paste it into your Wordle text box. This will give you a word cloud for each question's results.
Many thanks to Socrative Garden for this idea!
As always, please let us know if you have any questions, comments, or suggestions.
Over the last few years, I have used a post it note activity for this purpose. I would give the students three prompts: 'what is a goal you have for this year'; 'what is one question you have about me or my class'; and 'what is one concern you have about this upcoming year'. Students would choose two of these questions and write the response for each on a Post-it note. They would then place their Post-it notes on one of three poster boards I had put up on the walls in my room. Once my students had finished their responses, we would tour these boards and have an open discussion about common themes we saw that people had. The responses were anonymous, and this helped open doors to conversations as the year started.
While I liked this lesson, the poster boards covered in little stickies were difficult to organize and find patterns within them. It occurred to me that this should be a simple a way to do this with the technology we have on hand. With a few minutes of searching the Internet, I found a solution on a great blog called "Socrative Garden". Briefly, they take the questions that I use at the start of the year and turn them into an open response quiz on Socrative. Once the results are in, and you have them sent to you in spreadsheet form, you can copy the answers that were submitted for any one question and paste them into a Wordle.
To get started, you have a couple choices:
Option 1: if you want to focus on one question at a time, you can simply create a single question activity in Socrative: a short answer question.

Once your question is created, it is very easy to then create a Wordle in a matter of seconds. Once the activity goes live, the student responses will appear on your teacher screen.

Copy the results, and paste them into the text box at Wordle. Then click "Go."

You now have a word cloud of the results, which you can use to provoke discussion in your class. you and your students can see which words and terms came up most frequently – not only is this great for the start of the year, but also for any time you want a quick check in with the kids during class.
I can see using this at the end of a chapter in a novel, when reviewing what a student knows about any particular unit or questions they have about a particular topic, etc.
Your second option for how to set this up is useful if you have several questions that you want students to answer at the same time.
In this case, you would create a quiz based activity in Socrative.
This will allow you to create several questions together, which the students will take at one time.
Note that when you start a quiz activity in Socrative, the first question is automatically set to ask for the respondent's name. If you want your quiz to be anonymous, instruct students to simply enter a period for their name.
Add in whatever questions you wish. I leave the answer and explanation sections blank, as there are no right or wrong answers with this sort of an activity.
Once you finish designing the quiz, give it a name and save it.
Once you give the quiz, the live responses section on Socrative will not have any real results if you did not put in "right answers". Instead, you need to wait until all the students have finished and then end the activity.

When you end the activity, have Socrative email you the results.

This will give you a spreadsheet just like you get when you do a Google survey.
Copy one column at a time, and paste it into your Wordle text box. This will give you a word cloud for each question's results.
Many thanks to Socrative Garden for this idea!
As always, please let us know if you have any questions, comments, or suggestions.
Friday, August 23, 2013
Create classroom posters from any saved image...
Here we are, at the end of August, when our thoughts turn to the start of the football season - er, I mean setting up our classrooms. What better time to share a simple tool that can be put to immediate use as you unpack those boxes and start covering those bare walls?
Many times, I've stumbled across some cool image or a great quote that I'd like to turn into a poster.... for example, a friend of mine recently shared a Shakespearean rewrite of the Hokey Pokey with me... so, I typed it into an art program, gave it a background, and made this:

Nice, but it was 11 x 8 - only big enough for the nearest student to read, and totally unsuitable for my wall.
Trying to print it large size can be done by some printers and programs, but fiddling with the settings can be tricky.
 This is where Block Posters comes in.
 In three simple steps, it can take any file up to 1 MB in size and convert it into a poster that you can print, trim, and then use.
Here's how it works:
 First, when you go to the site, it will ask for the file you wish to "posterize."
Next, it will ask you for the size of the poster you wish to create. You choose how many 8.5 x 11 (or A4) pages wide your poster should be, and whether you want it oriented as portrait or landscape. It then shows you how the image will print (as seen on the left, below) and the actual size the poster will be when assembled (at the bottom, on the right).

 Once you click "continue," the site constructs the new image and saves it as a PDF. It then gives you a clickable link to download your finished poster.
Print it, trim it, and assemble it -- finished! I prefer to use glue sticks to assemble mine, and then run it through the laminator we have in the copy room. Want to see what the finished products look like? Come by room 309 - I have 2 posters up now, which I made through this service.
Per usual, if you have any questions, email us, post comments, or stop by.
Derek
Many times, I've stumbled across some cool image or a great quote that I'd like to turn into a poster.... for example, a friend of mine recently shared a Shakespearean rewrite of the Hokey Pokey with me... so, I typed it into an art program, gave it a background, and made this:

Nice, but it was 11 x 8 - only big enough for the nearest student to read, and totally unsuitable for my wall.
Trying to print it large size can be done by some printers and programs, but fiddling with the settings can be tricky.
 In three simple steps, it can take any file up to 1 MB in size and convert it into a poster that you can print, trim, and then use.
Here's how it works:
Next, it will ask you for the size of the poster you wish to create. You choose how many 8.5 x 11 (or A4) pages wide your poster should be, and whether you want it oriented as portrait or landscape. It then shows you how the image will print (as seen on the left, below) and the actual size the poster will be when assembled (at the bottom, on the right).

Print it, trim it, and assemble it -- finished! I prefer to use glue sticks to assemble mine, and then run it through the laminator we have in the copy room. Want to see what the finished products look like? Come by room 309 - I have 2 posters up now, which I made through this service.
Per usual, if you have any questions, email us, post comments, or stop by.
Derek
Thursday, August 22, 2013
Technology Resources on Learnist
First, for all of the new teachers at Oak and Sherwood...welcome to Shrewsbury! We are the Technology Teacher Leaders (TTLs) for Oak and try our best to send out "tech tips" that we think will be helpful in the classroom. Tech Tips from the last few years can all be found on our blog. If you have any tech-related questions, please feel free to send us an email!
Since Derek and I are no longer the Oak yearbook advisors (position is still up for grabs!), we hope to have more free time to blog this year. Please contact us if you have a tech tip request or, even better, if you would like to become a contributor to this blog. We still don't have the 1-to-1 iPad program in the 8th grade so it would be great to recruit some Sherwood teachers and 7th grade teachers.
One new addition to our tech blog - Deremy 2.0 - are pages that link to collections of resources on Learnist. I wrote about Learnist previously in this blog post. It is a site very similar to Pinterest but more focused on education. It is an excellent tool for curating and sharing online resources with others. Anyway, our goal is to create "learn boards" for different types of technology. So far, we have two learn boards set up:
When you click on these links, you will find a compilation of resources for both Google Drive and EE. These are the best, most helpful online resources we have found, including relevant posts from our own blog. If you know of other helpful resources that you think should be added, or if you have created something yourself, please share it with us so everyone can benefit!
We will continue to add resources to these two learn boards, and we plan to create new learn boards as well. Let us know if you have recommendations for other iPad apps that you would like for us to compile resources for. The next learn board we plan to create on Learnist will be a list of presentation tools students such as Prezi and Haiku Deck.
Again, please contact with any questions, comments, or suggestions!
Jeremy Mularella
jmularella@shrewsbury.k12.ma.us
Derek Pizzuto
dpizzuto@shrewsbury.k12.ma.us
Deremy 2.0 blog: smstechtips.blogspot.com
Traveling Tech Tools
All of our blog posts focus on ways of integrating technology in the middle school classroom. However, there are a lot of uses outside of the classroom as well. This blog post describes how I used utilized technology to make my trip to Iceland such a success.
Planning the Trip
My two friends and I (one of whom lives in London, England) used messaging on Facebook and a shared Google Doc to plan our trip. My brother's friend went to Iceland last year and emailed him the itinerary she did. I copied this into the Google Doc and opened it up for feedback. We each did research independently, and I kept track of these sites by bookmarking them using Diigo, which is a social bookmarking tool. I knew I would be bringing my iPhone and iPad on the trip, so these resources could be accessed later on through the Diigo app. With these tools, we were able to come up with a rough idea of what to do each day, as well as book our rooms in a hostel in Reykjavik for the week.
I purchased my flight through one of the many online dealers. I have not found one to always be better, but this time around, Priceline gave me the best price. The flight itself was through Delta.
Here are two apps I downloaded ahead of time for my iPhone/iPad along with a description of each:
TripTracker (free)
Get real-time status for flights, real-time itinerary push alerts, live weather reports, route maps, hotel information and car rental information to make your travel a breeze.
Fly Delta (free)
I always download the official airline app. You can check in and get real-time status for your flights. I received a message from them telling me my flight had been delayed and the number of my new gate.
During the Trip
When traveling overseas, you must be careful not to have "data roaming" enabled. I have read some scary stories of people being charged hundreds of dollars in roaming charges. Always turn "cellular data" off. To be safe, I turn on Airplane Mode. This still allows me to connect to WiFi, but nothing else. Last year on a trip to Italy, I contacted my service provider (AT&T) and purchased a one month international package that let me use cellular networks for roughly $30. The connection was spotty at best so I decided not to do it in Iceland.
Since I rarely was connected to the Internet while traveling, I ditched Google Drive for Evernote. While I could read my Google Docs, I could not edit them. I happen to be an Evernote Premium member, so I can download notebooks and edit them offline. As it turned out, Evernote was very helpful for two main reasons:
1. I created a note for our budget. Since there were three of us taking turns paying for food, gas, excursions, lodging, etc., we had to make sure we all paid equal amounts. I used Evernote to take photos of receipts, plus noted the amount of every expense throughout our stay.
2. Since we could not access Google Maps as we drove (no WiFi), I looked up all of the places we planned to visit on Google Maps the day before while at the hostel. I then took screen shots of those maps and added them to our Evernote Notebook. If we got lost, we looked at the map and figured out where to go.
eCurrency ($.99) was another very helpful app. As I mentioned before, the Icelandic currency is confusing. For example, a typical beer costs 1,000 Kronas, which is roughly equivalent to $8. This app lets you quickly and easily convert between any two currencies. The exchange rate is updated daily so you know it's accurate.
After the Trip
Once my friends and I returned home, our first priority was to share photos with each other. Collectively, we took over 1,000 photos, but hey, Iceland is a beautiful country! We each used a slightly different approach to do this:
Friend #1: Created a Dropbox folder containing his ~600 pictures and shared it with us. This worked very well until it maxed out the space allowance in my Dropbox account. I could not receive any more photos so my friend had to remove them and add the rest for us to download.
Friend #2: Created a Google Drive folder containing his ~100 photos. This worked just like the Dropbox route but since I have more storage in Google Drive, I was able to get them all no problem.
Myself: I put my ~300 photos into a folder on my computer. I then compressed that folder into a zip file. I placed this zip file into a Google Drive folder and shared it with my friends.
Once I received all of the photos, I sorted through them and placed them into different folders. I used Photoshop to touch up some of the photos. If you do not have Photoshop, there are a lot of free options online such as Pixlr and Aviary.
The last step is to back up my photos online and share them with friends. Many people choose to share all of their photos on Facebook. While I did post some photos on my Facebook Timeline, that is not where I would choose to host all of my pictures. For this purpose I choose to use Flickr. This is Yahoo's photo sharing service and is used by many professional photographers. Not only is it just better than other photo sharing sites, but you can sign up for a FREE account and receive 1 terabyte (TB) of free space.
To put this in perspective...if you have a 5 MP camera, you can upload 700,000 pictures!! No other site comes close to giving you that much space for free.
Thursday, April 18, 2013
Step 2: Curating and Sharing Open Educational Resources
Okay, let's assume you have found some great educational resources for our classroom. Now what?
Dictionary.com defines curate as "to pull together, sift through, and select for presentation..." I couldn't have said it better myself. You must collect and save these resources, then organize them in a way that makes sense to you.
I would like to stress the "sharing" component. Teachers often do things in isolation and re-invent the wheel. Especially with the Common Core and new science standards, it's essential for teachers to be more social and share resources with each other. We're all in this together.
There are many tools out there for curating resources. I have long used the social bookmarking site Diigo for this purpose. (See our prior post on social bookmarking in the classroom.) It's great for collecting resources, but not so great at sharing. A lot of teachers currently use services Google Drive, Evernote, and/or Edmodo to share resources with students. Their drawback is the limited types of resources they can handle (for now at least). I went searching for a way to curate and share all types of digital resources. I have found the perfect solution in Learnist.
 Learnist is relatively new service and clearly modeled after Pinterest. In fact, it is often referred to as "Pinterest for education". Users create "digital learning boards" on varying topics. They can then add endless digital resources ("learnings") to each board.
It is very easy to add and organize content in Learnist, either directly on the website or through a browser bookmarklet. Learnist allows you to add a wide variety of content: PDFs, websites, blog posts, Google Maps, YouTube videos, simulations, Google docs, and Google forms to name just a few. The cool part is that all resources are viewed within the Learnist site. You can even click through presentations and complete surveys. You can even add entire Google Drive folders or link to other Learnist boards. Pretty much every digital resource I have collected can be organized and shared!
Check out my Learnist profile page to get a sense of how I am currently using it. So far, I have created a few learning boards for various science units and projects and have started to add materials to these boards. I gave Learnist a test drive recently to share resources with my students for their roller coaster energy project. They seemed to like it.
As you add "learnings" (the various resources you collect) to a board, you can rearrange their order. For example, you may want the most important information at the top of the list.
"Marked done" feature
As you look at the resources in a board, each one has a checkmark at the top right where you can check off a resource once you have looked at it. Imagine you have a board that includes five resources for students to look at. This feature is helpful for students to keep track of resources they have already looked at.
Re-add learnings to a different learning board.
This is probably my most favorite feature of Learnist. Not only is Learnist my favorite tool to curate and share educational resources, but it's also an excellent place to find resources! You can search for content and find some great resources being shared by other teachers. For example, I found a learning board created by another teacher on renewable and non-renewable energy. Each resource in that board has a "re-add" button that allows me to quickly and easily add that resource to one of my own learning boards.
Each board can have multiple collaborators.
Multiple teachers can share resources together on a single board. These combined resources can then be shared with all of their students. Another great potential of Learnist is to have students use it. This is a great way for students to collaborate on group research projects.
Learnist is social
Learnist provides many sharing opportunities. You can "like" resources and "follow" other users. If your students decided to use Learnist to curate their own resources, they could "follow" you to get quick access to your materials.
Suggest learnings
Learnist users can suggest possible "learnings" to other users. I have already had a student suggest a website for me to add to one of my roller coaster physics board!
Learnist iPad app
Learnist recently came out with a free app which makes viewing resources on an iPad a breeze. Students do not need an account to view your resources. You are also able to add pictures from the camera roll to a specific learning board. In the future, I expect you will be able to share even more.
How to use Learnist on the iPad
Special learning types that can be added to Learnist
Using Learnist in the high school classroom
Why I love and use Learnist (and why you should too)
My 10 favorite Learnist boards built by teachers
These learning boards created by teachers range from Ancient Civilizations to Speech and Drama)
Dictionary.com defines curate as "to pull together, sift through, and select for presentation..." I couldn't have said it better myself. You must collect and save these resources, then organize them in a way that makes sense to you.
I would like to stress the "sharing" component. Teachers often do things in isolation and re-invent the wheel. Especially with the Common Core and new science standards, it's essential for teachers to be more social and share resources with each other. We're all in this together.
There are many tools out there for curating resources. I have long used the social bookmarking site Diigo for this purpose. (See our prior post on social bookmarking in the classroom.) It's great for collecting resources, but not so great at sharing. A lot of teachers currently use services Google Drive, Evernote, and/or Edmodo to share resources with students. Their drawback is the limited types of resources they can handle (for now at least). I went searching for a way to curate and share all types of digital resources. I have found the perfect solution in Learnist.
Learnist
It is very easy to add and organize content in Learnist, either directly on the website or through a browser bookmarklet. Learnist allows you to add a wide variety of content: PDFs, websites, blog posts, Google Maps, YouTube videos, simulations, Google docs, and Google forms to name just a few. The cool part is that all resources are viewed within the Learnist site. You can even click through presentations and complete surveys. You can even add entire Google Drive folders or link to other Learnist boards. Pretty much every digital resource I have collected can be organized and shared!
Check out my Learnist profile page to get a sense of how I am currently using it. So far, I have created a few learning boards for various science units and projects and have started to add materials to these boards. I gave Learnist a test drive recently to share resources with my students for their roller coaster energy project. They seemed to like it.
Some Learnist features and classroom applications:
Re-position learnings in a board.As you add "learnings" (the various resources you collect) to a board, you can rearrange their order. For example, you may want the most important information at the top of the list.
"Marked done" feature
As you look at the resources in a board, each one has a checkmark at the top right where you can check off a resource once you have looked at it. Imagine you have a board that includes five resources for students to look at. This feature is helpful for students to keep track of resources they have already looked at.
Re-add learnings to a different learning board.
This is probably my most favorite feature of Learnist. Not only is Learnist my favorite tool to curate and share educational resources, but it's also an excellent place to find resources! You can search for content and find some great resources being shared by other teachers. For example, I found a learning board created by another teacher on renewable and non-renewable energy. Each resource in that board has a "re-add" button that allows me to quickly and easily add that resource to one of my own learning boards.
Each board can have multiple collaborators.
Multiple teachers can share resources together on a single board. These combined resources can then be shared with all of their students. Another great potential of Learnist is to have students use it. This is a great way for students to collaborate on group research projects.
Learnist is social
Learnist provides many sharing opportunities. You can "like" resources and "follow" other users. If your students decided to use Learnist to curate their own resources, they could "follow" you to get quick access to your materials.
Suggest learnings
Learnist users can suggest possible "learnings" to other users. I have already had a student suggest a website for me to add to one of my roller coaster physics board!
Learnist iPad app
Learnist recently came out with a free app which makes viewing resources on an iPad a breeze. Students do not need an account to view your resources. You are also able to add pictures from the camera roll to a specific learning board. In the future, I expect you will be able to share even more.
Learnist Resources
How to use Learnist on the WebHow to use Learnist on the iPad
Special learning types that can be added to Learnist
Using Learnist in the high school classroom
Why I love and use Learnist (and why you should too)
My 10 favorite Learnist boards built by teachers
These learning boards created by teachers range from Ancient Civilizations to Speech and Drama)
Step 1: Finding Open Educational Resources
(Some of the information in this post came from a session at the iCon 2013 conference.)
This site offers educators a place where they can connect and share resources with other educators. OER Commons offers a vast database of teacher-created curriculum. The content is vetted for credibility and provides citations for reference. Users can sign up for a free account, share their own work, and access and curate their own content via their account.
CK-12 Foundation
Thanks to the Internet, there are endless resources out there for you to integrate into your curriculum. The first step is to search for these open educational materials (OER). Materials can include videos, songs, podcasts, handouts, lesson plans, digital textbooks, simulations/interactives, websites, handouts, primary source documents, etc. Keep in mind that not all resources can be accessed using an iPad! Many of the simulations and interactives in particular run on Flash. These must be accessed on a computer.
The list below is just a short list of what's out there. If you know of other sources, please leave a comment and share them!
OER Commons
This site offers educators a place where they can connect and share resources with other educators. OER Commons offers a vast database of teacher-created curriculum. The content is vetted for credibility and provides citations for reference. Users can sign up for a free account, share their own work, and access and curate their own content via their account.
YouTube EDU
Despite a lot of junk being on there, YouTube has a LOT of excellent educational videos. YouTube Education further weeds out a lot of the garbage and still manages to provide thousands of educational videos that can be narrowed down by grade level and topic.
*Two popular collections of YouTube videos are Khan Academy and Ted Talks. Click on the links below to visit them directly.
TedEd
ed.ted.com
"Create lessons worth sharing around YouTube videos."
Khan Academy
khanacademy.org
*Two popular collections of YouTube videos are Khan Academy and Ted Talks. Click on the links below to visit them directly.
TedEd
ed.ted.com
"Create lessons worth sharing around YouTube videos."
Khan Academy
khanacademy.org
MIT + K12
MIT + K12 is an MIT project that has MIT students create videos to explain math and science concepts for K-12 students. The videos are engaging. They demonstrate the science taking place through experiments while explaining the concepts that are taking place.
Gooru
goorulearning.org
Gooru is a "free search engine for learning". We shared this great search engine previously, but it's worth mentioning again. Search results contain millions of 5th-12th grade resources in math, science, and social studies. These educational resources range from videos and interactives to lessons and assessments.
CK-12 Foundation
The CK-12 Foundation offers FlexBooks, full digital texts that students and teachers can access on multiple devices. FlexBooks are available in PDF, MOBI and ePub formats. This gives many different devices access to rich content. You can create your own from scratch, use others "as is", or compile different FlexBooks together to make your own.
Project Gutenberg
Project Gutenberg has a collection of 42,000 free ebooks. These books were all previously published, but their copyrights expired and can now be shared for free. Project Gutenberg offers a variety of file formats for users, so they can be read on iPads as well as other devices.
It's important to note that any works by Shakespeare do not have line numbers. However, you can add your own! It's a bit time consuming but teachers will then have their own copy to use every year.
Library of Congress
The Library of Congress gives access to many digital "primary source" resources including photographs, historic newspapers, sound recordings, maps, and manuscripts.
Subscribe to:
Posts (Atom)