As Sherwood and Oak transform into true 1:1 iPad schools, one of the biggest obstacles continues to be "work flow". Everyone wants to know the best way of making class handouts accessible to students so they can read and annotate them on an iPad. Some are also starting to collect student work, grade it, then pass it back again. We'll cover how to do this last part in a future tech tip.
The good news is that there are numerous services that let you "push out" handouts and resources fairly easily to students. The bad news is that there is not a "one size fits all" answer. It really comes down to user preference. The best advice is to download a few of these and try them out. See which one you like...then go with it!
For those of you who attended one of the "iPad Work Flow" classes on Friday, Erica McMahon and I discussed the "big four" cloud storage companies: Evernote,
Dropbox,
Box, and
Google Drive.
The goal of the last three is all basically the same. They give you a place online to store materials where students can then access them. Evernote can do this as well, but it's really quite different than the others. Erica created the slideshow below that gives a great overview of work flow and compares the four services. You can also download Erica's original Keynote file here.
Sharing files
Regardless of which cloud service you decide to use, you must pay attention to the sharing settings you use. There are always multiple sharing options that can be summarized by two main types:
view and
edit.
When giving students access to your stuff, you want them to be able to view only! This means they can download files to view/annotate on the iPad. If you let them edit your stuff, they can then modify your documents or even worse, delete them. I will further explain sharing options for each service below.
You will usually be given a link to share with your students. When they click on this link, it will direct them to the files you want them to see. There are many different options of sharing this link with students. The link can be:
- emailed (the district is working on class distribution lists)
- posted on a website, blog, wiki, or social media site such as Facebook or Twitter
- shortened using tinyurl or goo.gl then written on the board
- linked to with a QR code.
Which cloud service is the best?
Again, there is no clear winner in the cloud service game. They all allow you to store files online. They all allow you to share files or entire "folders" with your students. I will provide more information for each one, plus give you some more information and suggest resources for Dropbox, Google Drive, and Evernote. I do not personally use Box, nor do I know many others who use it, so I won't get too detailed with that one.
Dropbox
Overview:
When you install Dropbox on your computer, it puts a folder on your hard drive that acts just like any other folder on your computer. The only difference is that there are little green checkmarks next to each folder and file indicating that is has been synced. Once synced, these files can be accessed from any computer via the website or any smart phone if you have the app installed.
Supported Platforms:
- Dropbox website
- PC desktop client
- Mac desktop client
- iOS app (universal app for iPad and iPhone)
- Android, Blackberry, and Kindle Fire apps
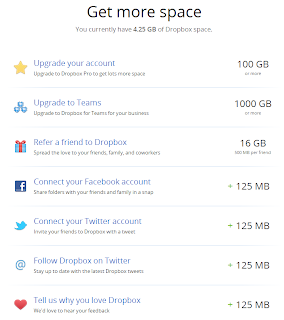
Free Storage:
2 GB (but you can get more space by recommending friends, uploading photos, connecting your Facebook account, etc.)
Max File Size:
No limit!
Sharing:

Folders and files can be shared in two ways. From the Dropbox website or within your Dropbox folder, you can "share the link". This will give you a link that you can share with others to give them access to your stuff. All students can do is view and download your files.
Box
Overview:
Box is similar to Dropbox, but not as good in my opinion. It does have some advantages over Dropbox including more free storage (5 GB compared to 2 GB) and Google Docs integration. However, it is missing one of the key components that makes Dropbox so easy to use. There is no desktop client for your computer (unless you upgrade to a paid version). In other words, it does not install a folder on your computer giving your "drag and drop" functionality. The free version also has a maximum file size of 100 MB whereas Dropbox has no file size limit.
Google Drive
Overview:
Google Drive is the reincarnation of Google Docs. It is clearly modeled after Dropbox and offers all of the same benefits including the installation of a Google Drive folder on your computer. The folder on your computer syncs ALL of your files, even online Google docs, spreadsheets, forms, and presentations. You must still edit them on the website, but organization is much easier now that you can see where everything is located. As of this posting, the iPad app also lets you edit Google Documents (without tables) with real time collaboration, just like the online version. Google spreadsheet and presentation editing is rumored to be coming soon.
Supported Platforms:
Free Storage:
5 GB (Extra space is very cheap as well. You can purchase another 25 GB of space for $30/yr)
Max File Size:
10 GB (which is larger than the amount of free space you get)
Sharing:
 |
| Click to enlarge |
Google makes sharing easy. You can share files and folders from the Google Drive website or from within the iPhone or iPad app. You cannot, however, share from your desktop at this time.
In the photo to the right, you can see that Google gives you three sharing options:
public on the web,
anyone with the link, or
private. All three options will give you a link to share, but the link will not work if it is private unless it is shared with each student individually.
The most important thing is to make sure that they are only given access to view.
Do not change this to "can edit". This would allow them to edit and delete documents!
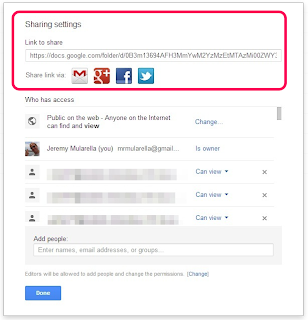 |
| Click to enlarge |
You can always take a look at the sharing settings for any given file or folder. In the screen shot to the left, you can see the sharing settings for the folder I share with my students. It is "Public on the Web - Anyone on the Internet can find and view." It also gives you a few ways of sharing the link including Gmail, Google+, Facebook, and Twitter.
I also shared this folder with students directly so they have easy access to it from within their own Google Drive accounts. I shaded out their email addresses, but you can see they can only view.
Evernote
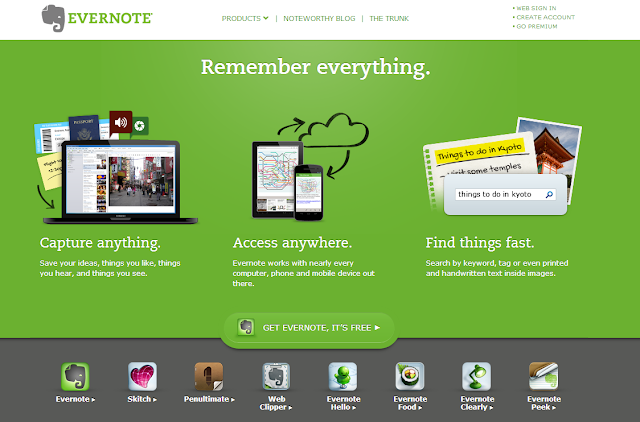
Overview:
Evernote is a very versatile application that lets you "capture anything". It is capable of doing many different things, but I will focus on just using it as a way of storing and sharing files. It does not use a folder structure like the other services. Instead, you create notes. You can then attach files or pictures to these notes. If you attended our Work Flow class, Erica explained how she uses Evernote. She likes being able to write directions in the note so students know what to do with the file. Different notes can be combined to make a "notebook". These notebooks are Evernote's version of folders. Evernote also makes use of "tags" to help stay organized. The free account is usually plenty for most people. They do have a premium subscription for $45/year.
They also offer a 50% education discount. All you need is 3+ teachers to sign up together!
Supported Platforms:
Free Storage:
Evernote handles storage differently than the others. Rather than a total size limit, you are allowed to upload 60 MB total each month. (1 GB for premium subscribers)
Max File Size:
25 MB per note (50 MB for premium subscribers)
Sharing:
It is possible to share entire notebooks or individual notes. You can either create a public link for anyone to access or you can share with other Evernote users. Just like with Google Drive, there are different permissions that allow others to view (which is what you want) or modify notes. The only drawback to sharing in Evernote is that the interface looks different, depending if you are using it on your laptop, the iPad app, the iPhone app, or the website.
Resources:
When choosing a cloud service, consider the other teachers you work with. If you teach on a team, it makes sense for you all to use the same thing. Not only will this make it easier for students, but this will promote sharing between teachers as well.
My recommendations
- If you are looking for something very simple and easy to use, start with Dropbox or Google Drive. Both offer desktop syncing and easy sharing options.
- If you are looking for a lot of advanced features, give Evernote a try.
- If you use Google Docs with your students, Google Drive makes the most sense. All students have been assigned Google accounts already so the iPad app gives them quick access to your stuff. Once the iPad fully supports editing of Google Docs, this will also become a powerful creation tool.
What I currently use
I actually use all three of these services in different ways:
Dropbox: I keep all of my own stuff in Dropbox. Most of it is private, and nothing in Dropbox is shared with my students. I have used a free service called
DROPitTOme to collect student work less than 75 MB in size. It automatically gets sent to your Dropbox account. This has been helpful for large files such as PowerPoints.
Google Drive: I use Google Drive for all of my school stuff. I have folders shared with teammates and folders shared with students and parents. I create most of my handouts in Microsoft Word. I save the original file in Dropbox, but I will also save a PDF version to Google Drive. I also use Google docs, spreadsheets, and presentations quite a bit.
Evernote: I am currently using Evernote for the first time this year, though I am not using it to push files to students. Instead, it is being used as a private test run of student portfolios. I created a notebook for each student and am adding student notes as the year goes on, including parent emails, observations, pictures of student work, etc.


