Thursday, May 31, 2012

An Easy way to Webcast

Before we get to this week's tech tip, a quick plug for some professional development running in the fall:


21st Century Teaching and Learning

In each session, we will focus on one 21st century teaching method or learning strategy. Then, each month, in a seminar format, one group of teachers will collaboratively present a lesson to the larger group, demonstrating use of the strategy in the classroom setting. You can read the details about the class, and how to sign up here:  https://docs.google.com/open?id=0B0_S7ee2sHDBODloeFBqM2lNOTA 

Come join us!


Now for the tech tip....
With all the talk about flipping classrooms, and making our class presentations / content available beyond the classroom walls, wouldn't it be great if there was a simple, one-button way to narrate and record a presentation - like a powerpoint - from our computers?  There is:

With Screencast-O-Matic, there is no big file to download and install, nothing you need to do beforehand - not even register, if you don't want to... and it's totally free!  Here's what to do - this video shows how simple the tool is to use...


Here are the basic steps, spelled out:

First, have the presentation or website you want to narrate open - if it's a Powerpoint, just have Powerpoint running, if it's an online presentation, have the presentation (or whatever it is you are looking to narrate) open in another tab in your browser. 
Next, on another tab, go to screencast-o-matic.  

You'll see something like this:    


The "Start Recording" button is towards the top right.


Once you click the button, you'll see this screen...


And then you might be prompted to run the actual little program from their website.  Just click "run."
This will give you the recording tool.  The dotted line is the actual area you will record - you can adjust the size to any size you need.  If you click on a different tab, or minimize your browser window, you'll still see the box - it will record whatever is on your screen, inside the box, as long as you don't close the Screencast-o-matic tab itself.

All you need to do now is plug in a microphone (if you have one) and hit that little red record button at the bottom of the dotted box.  Pause when you want to pause, and preview it when you're done.


Once you are done, all you need to do is choose how to publish it, give it a title and a description, and you're done!  Share the link with your students, and they can view it at any time.
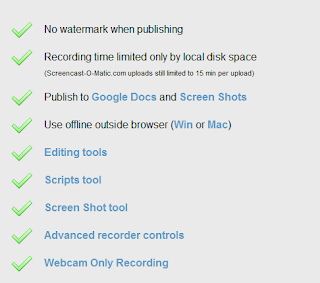


Looking to do more with it? For 15 dollars a YEAR, you get a lot more features - you can create videos of any length and save them to your hard drive (the free version allows 15 minute-long videos), you can publish to Google Docs, and do a lot more editing...


Here is a webcast I created using this tool:


SO... give it a try -- and let us know what you think!

Wednesday, May 23, 2012

8 iPad Tips and Tricks Everyone Should Know


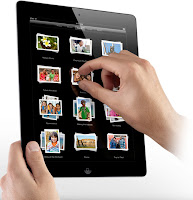
Now that all Sherwood and Oak teachers have an iPad to use, it's time we shared a list of some of the important tips and tricks that everyone should know about. They are all pretty simple and do not require advanced knowledge. We don't have the newest iPad model to test, but we think all of these tips and tricks are true for both the new iPad and the iPad 2, as long as they are running the most updated software (iOS 5) which they all should be.


1. Rearrange and delete apps

As you install apps, you will want to either move the apps to a different screen or delete an app that you no longer use. In order to do this, touch any app on the screen and hold your finger down. After about one second, you will notice all apps start to wiggle around around. Most of the apps have a little "x" in the upper left corner of the app icon. Clicking on the "x" will delete that app from your iPad. Native apps that come installed such as the calendar, mail, and Safari apps cannot be deleted. While the icons are wiggling, you can click on any icon and drag it to a different location. If you drag it to the side of the screen, it will let you move it to a different screen.

Home button
Regardless of how many screens you have, you will notice that the apps in the "bottom tray" always stay there. By default, there are four apps in the bottom tray. Not only can you change which apps go in the tray, but you can actually have up to six apps. You change them the same way as mentioned above. If you want to remove an app from the tray, click on it while it is wiggling and move it out. Likewise, if you want to add one, click and drag that app to the tray. Once you are finished rearranging everything, click on the "Home" button. The icons for the apps will stop wiggling and saved in their locations.

2. Organize apps into folders

As you install more and more apps, you will most likely want to organize apps and place them into folders. To do this, follow the steps above and press/hold on one app to make them all wiggle. Then, click and drag one app onto another app, and a folder will pop up with these two apps inside. Based on the apps, it will give a default name for the folder such as "Science" or "Games" but you can rename the folder. You can store up to 20 apps in each folder. Once you are done organizing apps into different folders, you can move those folders on to the screen you want. Then, like before, click the home button to save the current settings. 

3. Close apps running in the background

The iPad is quite the multitasking tool and can run a LOT of apps in the background. Whenever you use an app and close out of it, that application is likely still running in the background without you knowing it. If you have too many apps running, it can slow down the iPad. To see all apps that are open and running, double click on the Home button. The bottom tray will lift up to expose all apps still running. If you want to close one of these apps, it is similar to how you would normally delete an app. Press and hold on onto it until it wiggles. Instead of an "x" in the upper left corner, there will be a red (-) sign. Click on that (-) sign to close the app. It's probably a good idea to close all apps running in the background from time to time to keep the iPad running smoothly.

4. Notification Center

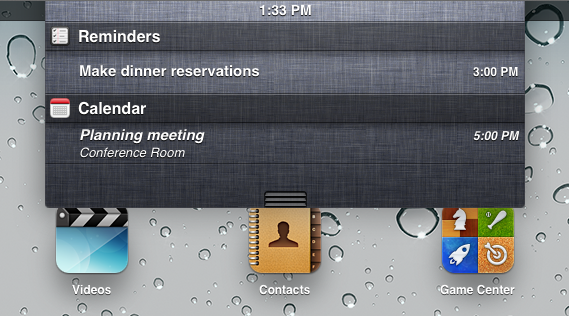
New to iOS 5, iPads now come with a Notification Center. It notifies you of calendar events, friend requests, breaking news, the weather, messages, and anything else you choose to be notified about. In order to see a summary of the current notifications, click on the date at the very top of the screen and drag down. In the iPad's Settings, you can choose which apps you want to send you notifications such as Mail, Calendar, Reminders, and Facebook.  

5. Swiping gestures

While everyone can intuitively figure out how to move their finger across an iPad to make pages and screens move around, not many know that there are multiple "gestures" you can do on the iPad. Please read about all of them here. Some are pretty cool! My favorite one is the "Four or Five Finger Pinch".

6. Find my iPad (or iPhone or iPod)

Under the iPad settings, you have the option of turning on the "Find My iPad" feature. In order for this to work, Location Services must be "On" and the iPad must be connected to Wi-Fi. Once it is turned on, you can log into https://www.icloud.com/ to find where your iPad (or iPhone) is located on a map. It is usually VERY accurate. You can also have the iPad play a sound and display a text message such as "Please return this iPad to room 311". In case you think the iPad has been stolen, you can also do a remote lock or remote wipe of the iPad which will delete everything. 

7. Maximize battery life

Even though the iPad has a very long battery life, there are reports some of the new iPads do not last as long as the iPad 2. Even if it does last a solid ten hours, it is always helpful to know what you can do to extend the battery life even longer. 

Read this article from "How-To Geek" with some great suggestions. There is one tip that does not apply to you though because it suggests you use Wi-Fi when possible instead of 3G. These iPads only work on Wi-Fi, but it is a good tip for all iPhone users out there.

8. Take a screen shot of your iPad screen

If you want to take a screen shot of what is displayed on your iPad screen, it is pretty simple to do. Hold down the "Home" button and the "Power" button on the top right of the iPad at the same time for a split second. The screen will flash, and the image will be saved to your iPad photo library.

Other Tips and Tricks?

This is a good list to get people rolling. Hopefully everyone learned at least one new trick. If you have questions about how to do anything mentioned in this post, please send us an email or stop by our rooms (310 and 311), and we will show you. On the other hand, if you know of any "must know" tips and tricks for the iPad, please leave a comment!

Wednesday, May 16, 2012

Online Office Hours with Google Docs

Before we get into this week's tech tip, I want to present a nice little keyboard case for the IPad 2 -- I was looking for an inexpensive way to protect my IPad, and give me access to a real keyboard (one that wouldn't take up 1/2 the screen whenever I needed to type).  In an earlier post about the Burlington 1:1 summit, we mentioned a case we saw during a presentation - it turned the IPad into what looked like a little laptop: the Clamshell.  It was very nice, but 150 bucks was more than I wanted to spend.  


Enter New Trent.   Here's their case:

 It's relatively light and compact, and the IPad can sit either horizontally or vertically.  


It has three different angles that you can set: 45, 60, or 75 degrees, and the keyboard can be removed from the stand for independent use.  


The case snaps on easily (once you remove the rubber sleeve our school Ipads have), and it gives full protection to the IPad, with a solid shell all around.  


Also, when you close the IPad into the case, the unit turns off; similarly, it turns on as soon as you open the case for use.


Cost?  40 bucks with shipping included on Amazon -- a solid value, and I've been quite happy with the results (minus the incredibly poor English in the manual)...


Now for today's post:  Online Office Hours.


I've struggled with having extra help reach a range of students -- many can't or don't stay after, and the twenty minutes or so at lunch is really limited.  I already have my students do a lot of work on Google Docs and, as I detailed in the Google Docs PD I ran a while back (and detailed in a post on another blog), I use Google Docs as a digital white board, where I can save each class' board notes and make them accessible to all students.


The next logical step was to use the same format for extra help sessions.  Here's how I set it up:


First, I created a new Google Doc.  I set it up with an embedded table, like shown to the left here.  On one side, a student could post a question.  On the other side, I post an answer.  Up top, I list the session topic, and when the office hours will be "open."
Next, I change the sharing setting to public on the web, anyone can edit.
I then post the link -- for my classes, I put it on the team's discussion board, and advertise the help session in my class, where I list my homework. 


If I were to give them the link in class, I would first copy the page address from Google Docs into tinyurl.com and shorten to something easy, like "LTPHelp" for the one on the left here.


Then, for that hour of time (I generally run mine from 8 to 9), I have my computer open at home, and I periodically check for any questions.  I can immediately see how many people are on the document, and if anyone is typing.  You can see the full extra help document here.


Why do online hours?  I've noted a number of benefits, including:

  • much higher student involvement.  My last session had over twenty students in attendance, for part or all of the session.  A number of students pop in and just observe - reading through the questions and answers to help their own understanding.
  • I can reach the students when they need the help most.  Before an assessment is due, or in the midst of a big assignment, I can be available for those last minute questions or big concerns.
  • Student posts are anonymous - no sign in is required.  Why is this a good thing?  Some students feel awkward about asking questions.  Here, no one knows who is doing the asking, including me.  I find this liberating - often, we have preconceived notions about what a particular student should or should not know... here, the playing field is leveled.
  • After the session ends, I can turn off the editing permission, and post the link to the session - now every student can have access to the questions and answers from the session, and I can refer back to the questions in class.
  • Beyond this, these sessions train the students for a format that they will see more and more as they move through high school and beyond.
Need more information?  Interested in a walk-through to set one of these up?  Stop by, or drop me an email.


Wednesday, May 9, 2012

Build your PLN with Google Reader

As we all know, education is constantly in a state of flux. There are new standards, new technologies, and best teaching practices are always evolving. We are living in the Information Age. Why read a book on technology when that book will likely be outdated by the time it hits the shelves? The Internet gives us immediate access to the most updated information available...and it's free.

One of the buzz words in education today is the PLN. This acronym stands for Personal Learning Network or Professional Learning Network, depending on who you talk to. It includes teachers in your building and across the district. However, you can also build connections all over the world. There are many Web 2.0 tools such as social media (Facebook, Twitter, LinkedIn, etc.), blogs, and wikis that allow these connections to support your teaching in the classroom. More and more teachers use their PLN for "professional development" purposes. The best way to start your own PLN is to collaborate with teachers in your district. If you are looking to spread out a bit more, start by "subscribing" to educational blogs that you are interested in.

If you aren't sure where to start, you can take this FREE Web 2.0 Tools eCourse! Basically, you will get a email each day for two weeks. Each email will outline one specific Web 2.0 tool that you could use to begin building your PLN.

RSS stands for Real Simple Syndication, and it has totally changed how people access information. Rather than going to all of the sources, you can subscribe to their "feeds" and let the information come to you. The video below gives an overview of how to do this with a service called Google Reader. If you have a Google account, and all of you do, then you already have Google Reader.


Google Reader is just one of many news aggregators. Some are web-based, some are plugins or extensions, and some are downloaded to your desktop. All of them work basically the same, but Google Reader is very popular, easy to use, and has a great interface. When you visit a blog or website you are interested in "following", look for some type of icon you can click on to subscribe to that site. It may look like one of the ones below, and all blogs will have some type of icon or link to "subscribe to me".

As the video above explained, you can either subscribe directly on the blog or website itself by clicking the appropriate "subscribe" icon, or you can do it through Google Reader by copying and pasting the link. If you are reading this in our SMS Tech Tips blog, you will notice an icon to the right that shows all of the different blogs that we follow.

Some topics these blogs focus on: technology, ed tech, standards-based grading, science, and fantasy football.  Derek and I each have a handful of blogs that we visit most often. Even though we have only met a few of these teachers face-to-face, we consider them all part of our PLN.
 

Recommendations 
  • Start small! Subscribe to a handful of blogs and get into the habit of visiting Google Reader often. If you don't find yourself interested in the posts, unsubscribe and move on to find something more interesting.
  • Feedly is a really cool website that "feeds" off your subscriptions from Google Reader to bring you relevant information. It is much nicer visually compared to Google Reader and gives you easy access to all of your feeds from any computer, smartphone, or tablet. You will need to download their app or plugin, but it's definitely worth it. I use Feedly now more than Google Reader itself. The video below gives a quick overview.


Ideas for Using Google Reader

You can subscribe to many things in addition to blogs and websites. Here are a few examples:

Subscribe to your students

  • If you have students write on a blog for any reason (reflection, portfolios, collaborative writing project, etc), you can subscribe to each blog so whenever they write a new post, it will be sent to you without you having to visit each blog periodically. 

Subscribe to social bookmarking tags
  • Delicious and Diigo are the two major social bookmarking sites where you use tags to organize your bookmarks. 
  • You can subscribe to a particular tag so whenever someone uses that tag for a site, you get notified. 
  • You can also add other people to your network and subscribe to their bookmarks. You get notified whenever they save a new bookmark. 
Get web search result feeds
 Subscribe to photo sharing websites such as Flickr and Picassa
  • You can subscribe to RSS feeds at many photo and video sharing sites keeps you updated when your friends and family add new media online.
Subscribe to updates for any website (even if they do not offer an RSS feed!)
Quick communication with parents
  • If you use a blog as a class portal to share information with parents, you can suggest that parents subscribe to your blog so they will get the updated information quickly without having to visit the blog directly.

Additional Resources

Develop a PLN

Getting started with Google Reader

What's in your Reader?

How-To video for organizing blogs in Google Reader

Directory of free news RSS feeds

"RSS in Plain English" YouTube Video


Final thought...

While Derek and I use a lot of tech tools, there are a handful of essentials that we could not do without. We are big fans of Google Docs, Google Calendar, and Dropbox. I would also add Google Reader (and Feedly) to that list. I cannot stress how useful this can be. Not only have I learned a lot from teachers all over the world, but the information I learn keeps me motivated and eager to learn more.

Wednesday, May 2, 2012

Don't search it - Grok it!

First off, five points to anyone who can tell me - without looking it up - what "Grokking" is from.  Yes, if you know this, you're something of a geek.  But, that's ok.  Geek is Chic!

OK, on to the post of the week.  Did you ever use that cool search wheel thing that Google once offered? Well, there's a pretty cool version of it, revived by another company:

This is one cool search tool - not only does it create a map of the concept a student is searching for - sort of a thesaurus of related terms that they can click on - but it also gives them access to a variety of source materials right on the screen, which they can save... and so much more.

This video does a nice job of explaining the basics:

So, in a nut shell, here's what it does.  When a student goes here to conduct research, they are given a much more informative panel of information than they'd get on Google.  Consider this example, where I searched for "feudalism":

In the main window, I have a word web.  This shows me the main term, and words closely associated with it.  To the right of the wheel, there's a side bar with a TON of information:


 There's a list of key facts, each of which can be expanded - giving full information from a specific website, which is linked.


You can click for additional websites, specific videos, and specific images on the green menu bars below the facts.


Concerned about the complexity of some of this information?  Just slide the little lever at the top of the screen!  This allows a student to set the difficulty level of the search - from elementary (the chalk board) to advanced (the Eistein).  This allows the material to be differentiated, helping each student challenge themselves appropriately.

So, what do you do with the information you find?  One nifty feature here is the little green button next to each piece of information, video, or image.  This little push-pin attaches the information to the word web, as you can see below:


Here, I clicked on a couple facts, a picture, and a video - each is now attached to the key term that was the focus on the search.


It's a nice visual... but, even better, the selected information also appears in the student's journal, right on the site:


Here, all the information is sorted by type and given a link to the original source - where the student can delve into deeper information and create a full citation for the source (or paste the link into Easybib, and then track from there - but I digress).


These notes and images can be edited, exported, and saved for use in a paper...


And, if you're looking to dig deeper, you can click "more" next to those green bars - for example, if I click for "more" websites, I get this:


This page organizes the information I can find - each website is in its own box, where I can see the concepts it covers, along with a brief preview.  I can see its complexity as well - that's the little cap and diploma icon tells me that these three sites are pretty advanced.
 If I like any of them, I can use the green button to pin them to my journal; if I reject any of them, I can just click the little trash can and remove it from the page.


Some of the real benefits come when you register as a teacher:  Once you do this, you can create a class code, which your students will use when they go onto InstaGrok.  With this class code, you are able to check your students' progress - sites they have visited, notes they've put in their journals, etc., making it a lot easier to help each child reach their potential.


This video does a nice job of explaining the benefits of using InstaGrok as a teacher - give it a look; the visual does a better job of doing this site some justice:


This site has some great potential - for differentiating materials during research, and for helping track what students do find.  Give it a shot - play around with it, and see for yourself!

Until next week,

Derek & Jeremy